
 English
 русский
 Español
 عربى
عربى
Meat Display Cases Buying Guide: Self-Contained vs. Remote for Your Butcher Shop
Content
- 1 Why the Right Meat Display Case Matters for Your Business
- 2 Self-Contained vs. Remote Meat Display Cases: A Side-by-Side Comparison
- 3 Temperature & Humidity Requirements for Different Meat Types
- 4 Key Features to Evaluate: Glass Type, Material & Refrigeration System
- 5 How to Size a Meat Display Case for Your Store
- 6 Installation & Maintenance Best Practices
- 7 Cost Analysis: Initial Investment vs. Long-Term Operating Expenses
A 2-degree temperature swing can cut your meat’s shelf life by a full day. Yet many butcher shops and supermarket delis run cases that drift in and out of safe zones without anyone noticing until product starts to turn. The right meat display case does more than keep product cold — it preserves texture, color, and moisture while drawing customers in. In this guide, we strip away the sales talk and focus on the hard numbers that will define your purchasing decision.
Why the Right Meat Display Case Matters for Your Business
Meat display cases are one of the few pieces of equipment that directly impact both food safety and impulse sales. When temperature control fails, you lose inventory; when lighting and glass clarity fall short, you lose customers. A study on retail meat spoilage found that for every 2°F increase above optimal range, the display life of fresh red meat drops by roughly one day. Multiply that across a full case and the waste adds up fast.
Beyond preservation, visual merchandising is the silent salesperson. Curved glass cases with high-transparency panels and natural-spectrum LED lighting make product color pop. Shoppers will linger longer in front of a case that presents meat as fresh and vibrant. A well-designed case also affects labor efficiency — easy-access front glass, proper shelf spacing, and organized storage reduce restocking time at the end of a shift.
Operational costs are another reason to pay attention. The difference between an energy-efficient case and a poorly sealed one can exceed $1,200 per year in electricity alone. When you factor in maintenance, refrigerant top-offs, and part replacements, the 5-year total cost of ownership varies by thousands depending on the technology you choose. The next sections break down those differences so you can make a data-driven decision.
Self-Contained vs. Remote Meat Display Cases: A Side-by-Side Comparison
The first fork in the road is whether to buy a self-contained unit with its own compressor or a remote case that connects to a centralized refrigeration system. Each has distinct strengths, and the right answer depends on your store’s size, existing infrastructure, and growth plans.
Self-contained cases house all refrigeration components inside the unit. They plug into a standard wall outlet, require no field piping, and can be repositioned as your layout evolves. That plug-and-play convenience comes with a higher upfront price per linear foot and a slightly larger on-floor footprint. They also reject heat into the sales area, which your HVAC system must handle — a factor often missed in initial budgeting.
Remote cases, by contrast, rely on an external condensing unit mounted in a mechanical room or on the roof. They run quieter on the sales floor, produce far less ambient heat, and typically achieve better long-term energy efficiency. The trade-off is installation complexity: you need a licensed refrigeration contractor to run refrigerant lines, install the condensing unit, and commission the system. That work can add $2,500 to $5,000 or more to your project, depending on distance and building structure.
| Factor | Self-Contained | Remote |
|---|---|---|
| Initial Cost (per 6 ft case) | $5,500 – $9,500 | $4,000 – $7,000 (plus condensing unit & install) |
| Installation Complexity | Low — plug-in, immediate startup | High — requires refrigerant piping and commissioning |
| Floor Space Impact | Larger footprint, compressor compartment eats space | Slimmer footprint, no on-board compressor |
| Heat Rejection | Discharges into sales area — increases HVAC load 5–10% | Heat rejected remotely — minimal sales-floor impact |
| Energy Efficiency (annual kWh/ft) | 1,200 – 1,600 kWh/ft | 900 – 1,250 kWh/ft |
| Maintenance Access | Front or rear panel access, technician works on shop floor | Centralized condensing unit, easier preventive service |
| Expansion Flexibility | Simple — unplug and move, add units individually | Requires condensing unit capacity planning for future lines |
| Best Fit | Butcher shops <800 sq ft, pop-up retail, seasonal markets | Supermarkets, large deli departments, stores >1,200 sq ft |
A butchery doing $8,000 in weekly meat sales inside a 600-square-foot storefront will find a self-contained case the most practical. A grocery chain planning six or more multi-deck cases across a 1,500-square-foot fresh department should plan for a remote system from day one. The total cost of ownership figures in the final section will help you plug these assumptions into your own P&L.
Temperature & Humidity Requirements for Different Meat Types
Not all proteins respond the same way to refrigeration. Red meat, poultry, and seafood each have narrow temperature and humidity bands that preserve color, prevent bacterial growth, and maintain moisture. Running a case at a generic “deli temperature” often leads to accelerated spoilage in one category while over-drying another.
Here are the target ranges used by high-volume meat processors and quality-focused retailers:
- Fresh red meat (beef, lamb, pork): 28–32°F with 85–90% relative humidity. Red meat displays best slightly above its freezing point — at 28°F, surface color holds for days. Below 85% humidity, edges begin to dry and darken within hours.
- Poultry (chicken, turkey): 30–34°F with 80–85% relative humidity. Poultry tolerates slightly higher temperatures because the risk zone for salmonella and campylobacter increases above 40°F; keeping it at 30–34°F achieves safety without freezing the superficial muscle tissue that affects appearance.
- Seafood (fish fillets, shellfish): 28–32°F with 90–95% relative humidity. This is the tightest band. Fish proteins denature quickly above 33°F, and low humidity causes gaping and drip loss. Many dedicated seafood cases include a drain pan and gravity-fed humidity system.
A combination that mixes red meat and seafood in the same case forces compromises. If your store sells both, split the line or use separate inserts. A fresh meat refrigerated display case engineered for red meat will hold precise 30°F with airflow designed to avoid surface dehydration, while a separate seafood case can push higher humidity without altering the other side’s performance. This segregation is not a luxury — it’s the difference between 5-day and 2-day display life for premium cuts.
Key Features to Evaluate: Glass Type, Material & Refrigeration System
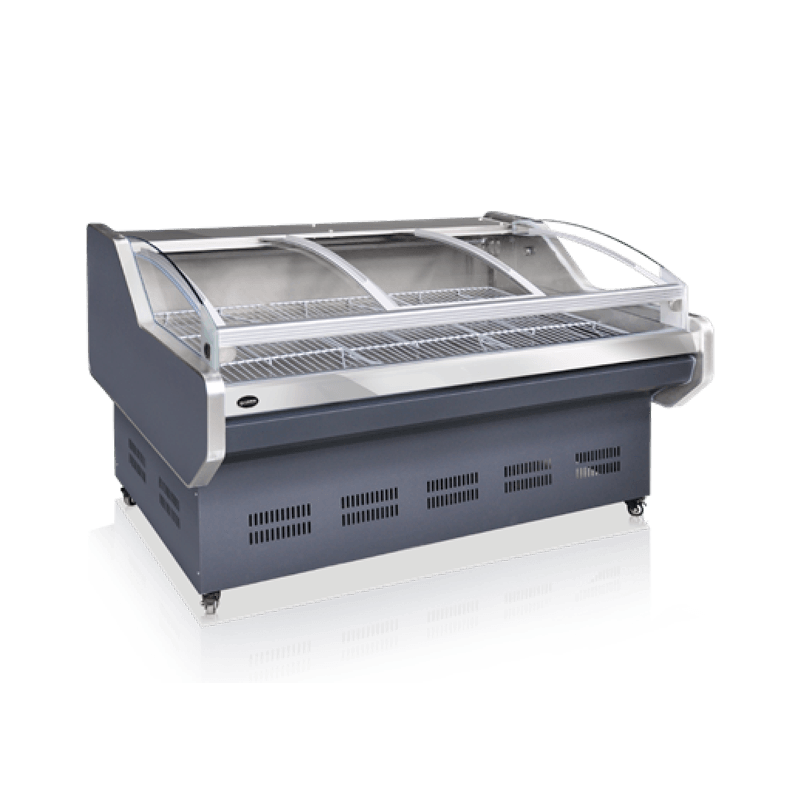
Curved vs. Flat Glass
Curved glass cases are the standard for front-facing meat displays. The continuous curve eliminates distortion at the corners and gives the product a three-dimensional presence that flat glass can’t match. The downside is that curved panels are 20–30% more expensive to replace and slightly less energy-efficient because the increased surface area allows more thermal transfer. Expect about 5–8% higher energy consumption on a curved case versus a similarly sized flat-glass unit.
Flat glass cases make sense in low-profile service counters, behind-the-glass deli setups, or spaces where the customer views product from above. They are easier to clean — no bowed corners to work a squeegee around — and replacement glass is stockable from aftermarket suppliers. For high-traffic self-service meat islands, the aesthetic uplift of curved glass typically justifies the extra operating cost.
Stainless Steel vs. Painted Exteriors
Meat processing environments demand surfaces that can handle daily sanitation with aggressive cleaners. The choice between 304 stainless steel and a painted galvanized body affects both lifespan and health-inspection outcomes.
| Feature | 304 Stainless Steel | Painted / Galvanized |
|---|---|---|
| Corrosion Resistance | Excellent — withstands chlorine-based cleaners and high salt exposure | Moderate — paint chips lead to rust within 3–5 years in humid zones |
| Typical Lifespan | 10–12 years of service counter visibility | 5–7 years before refurbishment or replacement |
| Cleaning Frequency | Can tolerate daily heavy-duty wipe down | Weekly soft-clean recommended to preserve finish |
| Cost Premium | 15–25% higher purchase price | Lower upfront cost, higher long-term R&M |
Refrigeration Components
The compressor brand inside your case determines most of your maintenance calls. Copeland and Embraco are the two names service technicians trust for extended duty cycles. A case running a Copeland scroll compressor typically delivers a mean time between failures exceeding 40,000 hours when paired with proper condenser cleaning. Off-brand or unbranded compressors cut that estimate in half and often lack available replacement parts in local markets.
The evaporator and condenser coil design matters equally. Meat cases with a large evaporator surface area and low air velocity (around 150 feet per minute) keep product from drying out. Look for cases that specify “low velocity, high humidity” evaporator engineering in the spec sheet — that phrase signals that the manufacturer has balanced heat removal with moisture retention.
How to Size a Meat Display Case for Your Store
Sizing is more than counting linear feet. The number of shelves, the well depth, and the intended product density all determine how many pounds you can display at once. A good rule of thumb is that each square foot of visible display area holds 5 to 8 pounds of fresh meat when properly faced and rotated. This assumes average cuts — bone-in primals will weigh more per volume and may exceed 8 lbs/sqft.
To size correctly, start with your peak-day sales volume. If you sell 200 pounds of red meat on a Saturday, you need 25–40 square feet of display area just to hold the day’s offering. Add 20% buffer for restocking and visual appeal. For a typical 6-foot curved glass case with three deck levels, the usable display area is roughly 18–22 square feet. That means one 6-foot case might max out at around 130–160 pounds — comfortably covering most independent butcher counters.
Larger operations should measure the floor layout and allow 36-inch aisles in front of open cases to avoid customer bottlenecks. A remote system with multiple 8-foot or 12-foot modules becomes the only scalable option once you exceed three individual units. The initial layout should also account for future service access: 18 inches of rear clearance for self-contained units and 24 inches for remote connection panels is the minimum to meet most local mechanical codes.
Installation & Maintenance Best Practices
Installation Steps
- Verify the floor is level within 1/8 inch across the footprint — uneven bases strain the compressor and misalign doors.
- Ensure dedicated circuits with proper voltage (check nameplate for 115V or 208-230V) and a GFCI-protected outlet as required by local code.
- Maintain minimum clearance: 6 inches from rear wall for self-contained, 12–18 inches for remote; never box in the compressor compartment.
- After placing the case, let it sit upright for at least 4 hours before power-on if it was transported horizontally — this allows oil to settle in the compressor.
- Run the case empty for 24 hours and record temperature every 4 hours at three shelf levels. The reading must stay within ±1°F of setpoint before loading product.
Ongoing Maintenance Tasks
An annual maintenance plan prevents 70% of emergency repair calls. The following tasks — with estimated costs — are the minimum for a reliable meat case:
- Clean condenser coil every 60 days (DIY with a coil brush and vacuum; professional cleaning $75–$120 per visit).
- Inspect and replace door gaskets annually ($40–$90 per gasket, depending on length).
- Check and clean the evaporator drain pan and line monthly to prevent ice buildup and odors.
- Replace air filters, if equipped, every 6 months ($15–$30 per filter).
- Have a licensed technician verify refrigerant charge and compressor current draw once per year ($150–$250 per unit).
- Sanitize surfaces daily with a food-safe cleaner; avoid ammonia-based products on stainless steel to prevent pitting.
Combined, annual maintenance runs between $200 and $500 per case, with occasional higher costs if a compressor capacitor or fan motor fails. Budgeting $50–$500 per year for parts replacement covers most mechanical surprises in a single case.
Cost Analysis: Initial Investment vs. Long-Term Operating Expenses
Focusing only on the purchase price misses the larger picture. A 5-year total cost of ownership calculation reveals that a pricier unit with better insulation and a branded compressor often costs less over its service life than a budget import with higher energy draw and more frequent repairs.
The table below compares three configurations common in U.S. independent butcher shops and meat departments. Energy costs are based on a national average commercial rate of $0.12/kWh and 24/7 operation.
| Configuration | Upfront Cost (6 ft unit) | Annual Energy Cost | Annual Maintenance (avg) | 5-Year TCO |
|---|---|---|---|---|
| Self-contained, painted exterior, flat glass, generic compressor | $5,800 | $1,150 | $380 | $19,450 |
| Self-contained, 304 stainless, curved glass, Embraco compressor | $8,200 | $1,080 | $290 | $17,050 |
| Remote (condensing unit shared), stainless, curved glass, Copeland compressor | $6,500 (+ $3,200 condensing unit install) | $950 | $310 | $16,500 |
The lowest upfront price ends up costing nearly $3,000 more over five years than the remote option. That gap widens further when you consider the resale value of a name-brand compressor system. Commercial kitchen equipment liquidators routinely pay 20–25% more for a well-maintained Copeland-powered case than for a no-name alternative.
The lesson is straightforward: treat the purchase as a 5-year investment, not a one-time expense. Request spec sheets that list compressor make and model, coil type, insulation foam density, and wattage at setpoint. These four data points predict 90% of your operating cost variance.


